|


Lakewood
Weather

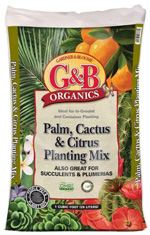
Especially formulated for the needs of palm, cactus, citrus & succulents.

Have a Look
Around the Site:
|
|
|

October |
|
Certain Flowers Thrive in Cool Weather
Plant fall annuals such as pansies, violas, primrose and calendula so they will be in full fall and winter bloom. Perennials including nemesia, godetia and schizanthus are also good choices for a richly varied fall and winter flower garden.
|
|
Contact Information:
E-Mail:
Click to e-mail us.
Telephone:
(562) 804-2513
Address:
6220 Lakewood Blvd
Lakewood, CA 90712
Hours:
Monday through Friday: 7:30 - 5:30
Saturday: 8:00 - 5:30
Sunday: 9:00 - 4:30
|
 Helps produce more abundant, better tasting and more nutritious vegetables.
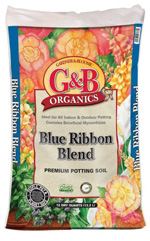
 An exceptional potting soil for indoor and outdoor containers.

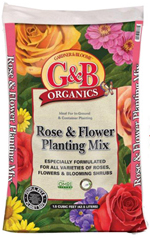
 Ideal for a variety of in-ground and container planting.
|
|
 |
Featured Quote:
"Bittersweet October. The mellow, messy, leaf-kicking, perfect pause between the opposing miseries of summer and winter."
~ Carol Bishop Hipps
|

|
Next to spring, fall can be the best time for some colorful action in
the rose garden. While most modern hybrids do bloom through the
summer, the bloom size tends to decrease substantially as a result of
the high summer temperatures. As fall approaches, roses once again
"come into their own," sporting some of the largest
blooms seen since the previous spring. Take some time to enjoy this
display, because all too soon, they will be entering their winter
period of dormancy.
Here are some fall tasks to help ensure your roses will remain
healthy and ready to take off again next spring:
- Continue watering
You
will not need to water as frequently as you did in the summertime,
but roses still require water through the fall. Continue to water
deeply but less often.
-
Discontinue feeding
After October, fertilizer is no longer necessary or desirable as you
want to encourage the plants to enter dormancy.
-
Continue treating for insects and diseases
Treat only if you notice any damage.
-
Clean the area around the plants
Pick up and dispose of any fallen
leaves or old flowers. Healthy leaves can be used in the compost
pile, but do not use those that are damaged by insects or disease.
-
Do not prune
While you may continue cutting flowers to bring in the house, do
not cut the plants back severely yet. Wait until January to do your
major yearly pruning.
-
Assess your rose garden
Now is a good time to look at your
rose garden with a critical eye. Are there roses that did not
perform to your expectations or plants that have lived past their
prime? You can remove those plants now to make space for some new
plants come bare root season (December through February).
-
Research
Think about candidates to add to your rose
garden. Whether you're looking for fragrance, large flowers,
blooms to cut or unusual color combinations, there's a rose
that will fit the bill! Go online and see all the new varieties (and
all the old favorites) available.
Click to print this article.
|
 |
|
|
|
By Tamara Galbraith
Nowadays, Americans are eating five times more fresh spinach than we did in the 1970s.
And forget about the canned, slimy stuff Popeye downed in one shot back in the old days; we now prefer our spinach fresh.
And what could be fresher than growing it yourself? The cool temperatures of autumn are perfect for optimum spinach production.
Those of us gardening in warmer regions grow spinach through the winter, as long as temps stay above 25 degrees. A light frost will not hurt it.
There are generally two types of spinach: smooth or savoyed.
Smooth types are more tender and are best for salads, while the crinkly leaves of savoy spinach can be rubbery and are better for cooking.
Some spinach cultivars walk the line between smooth and savoyed and are pretty yummy either raw or cooked.
If you're starting your spinach from seed, soak the seeds in a plastic baggie overnight in the refrigerator before planting.
This will soften the hard coating of the seed and allow better germination. Place transplants about six inches apart, and make sure the soil stays moist and cool.
The biggest enemy of spinach is heat, so use shade cloth if temperatures rise dramatically during the day.
Mulch is also a good addition for keeping the soil cool. Spinach, like lettuce, does well in containers--with the advantage that you can move them into shadier areas if it gets too warm.
You can harvest spinach by individual leaves or by cropping off the entire plant at the base.
As long as temperatures remain cool, the plant will continue to produce leaves...and keep those delicious spinach salads coming.
Click to print this article.
|

|
At this time of year, when the temperatures are beginning to cool, a the children are gearing up for Halloween and the ubiquitous Jack-o'-Lanterns.
First consider where your pumpkins will be placed. If they are to grace the stairs leading up to your front door, select smaller pumpkins for carving. For a focal point on your porch, or a centerpiece for your table, go for a larger one. Just be sure that you choose pumpkins that are uniformly orange with no bruises or discoloration, and are either tall and narrow, or more rounded, depending on the design of your carving.

Next, your tools. A long thin-bladed knife is best for cutting the top hole and large pieces out of the face of the gourd, with a paring knife used for detail work. All of your tools should be sharpened before and after carving, so make this a family affair with parents in control of all carving tools! The little ones can draw the desired face on the pumpkin with a simple crayon.
Begin by cutting a 5- or 6-sided hole in the top of the pumpkin, about two-thirds the diameter of the pumpkin. Angle the knife so that the lid and hole will be somewhat cone shaped; this will help prevent the lid from falling into the hole.
Scrape the seeds and stringy membrane out with a large spoon, keeping certain to scrape the bottom flat so that the candle sits squarely. Then carefully carve with your paring knife the face you've drawn on the best side of the pumpkin. Finish up with a white votive candle in a clear glass holder. Better yet, be safety-first with a battery-powered LED flickering tea candle. You may need a couple of these to light your Jack-o'-Lantern sufficiently.
Fire safety should be paramount. Never leave a lit candle unattended, and never leave children alone with a lit pumpkin or any candles. Follow these rules and your pumpkins will be your scary pals throughout the holiday!
Click to print this article.
|

|
So, you've made your annual fall pilgrimage to the pumpkin patch and
you've brought your acquisitions home. You've carved the
jack-o'-lanterns and even made a few pumpkin pies (from scratch,
yet!). Ho, hum - there must be more to fall decorating than this,
right?
You're in luck--there is! With that same knife and scoop you used for
the jack-o-lantern, you can create a professional centerpiece for the
fall table! Here's how:
Buy a small to medium-sized pumpkin that is tall enough to hold your
bouquet.
-
Using a knife, cut a circle around the stem the desired size of your
future vase's opening. Set aside the top for later
use.
-
Scoop out the pulp and seeds and scrape the inside of the pumpkin so
it is smooth and clean.
-
Set your pumpkin out to dry. Choose a well-aired spot out of the
direct sun. Leave it there until the inside of the pumpkin feels
dry; this may take a day or two.
-
Cut a piece of florist's foam small enough to fit through the hole
at the top of the pumpkin; soak it well and place inside of the
pumpkin cavity OR
-
You can place an empty coffee can, margarine container or glass vase
inside the cavity of the pumpkin (which will be filled with water)
to hold the flowers. If choosing this method, make sure the
receptacle is stable (possibly use some sand in the bottom of the
pumpkin to create a nest for the container). The advantage of using
this method would be that the inside of the pumpkin would be kept
drier, preventing mold.
-
Arrange your flowers as desired, sticking their stems in the
florist's foam (or container) for stability. Choose fall flowers
such as chrysanthemums and asters combined with grasses, fall
foliage and berries, if desired.
-
Use the pumpkin top, more fall foliage and berries around your
pumpkin vase to finish the look.
If your vase will be a centerpiece for a festive holiday dinner, why
not add to the fun? Place a pumpkin sticker under one of the guest
chairs. At the end of the meal, whoever sat in that chair gets to
take the vase home!
Click to print this article.
|
 |
|
Should I use bone meal or bulb food when I plant my bulbs?
Answer:
We recommend bone meal at the time of planting, then applying a balanced bulb food once the foliage appears above the soil line in late winter/early spring.
There are a couple of reasons for this. Nitrogen can burn the actual bulb, which only needs the phosphorus and potash from bone meal in order to stimulate rooting. But once the bulb is sending out a stem, it needs nitrogen to become strong so it won't bend over from the weight of the flowers that it sets. This is especially important for bulbs with large heavy flowers, such as tulips, ranunculus, and hyacinth.
It's also important to dig the holes or trenches a little deeper than the bulb
needs to be, applying some bone meal below the bulb, then a little more soil
so the bulb doesn't sit directly on the food but has access to the food as it
sends out roots (got to give those roots some incentive to stretch).
Click to print this article.
|

This recipe makes an incredible presentation and is quite tasty as well! Enjoy!
What You'll Need:
- 1 large pumpkin
- 3 tablespoons unsalted butter
- 2 medium onions, diced small
- 1 Granny Smith apple [peeled and diced small]
- 2 teaspoons of oregano
- 1 teaspoon pumpkin pie spice
- 2 lbs. of acorn squash seeded, peeled and chopped into 1/2 inch cubes
- 3 cups chicken broth (optional); substitute a vegetable broth if on vegan diet
- 2 teaspoons sea salt
- pepper to taste
- 1 cup heavy cream
- chopped scallions for garnish
Step by Step:
- Remove pumpkin meat from pumpkin and discard seeds (or save them to roast).
- Put the pumpkin meat in a large bowl and set aside.
- Melt the butter and sauté the onions, apple and oregano with pumpkin pie spice for 7 - 10 minutes.
- Add the acorn squash and the pumpkin meat and sauté for another 5-10 minutes to ensure squash is softened.
- Stir in the stock (vegetable or chicken), along with the pepper and salt.
- Place on low heat for 20 - 25 minutes.
- When the squash begins to fall apart this is done.
- Using an immersion stick blender or food processor, blend until smooth.
- Preheat the oven to 350 degrees.
- In the pumpkin shell, add the cream and the purée.
- Bake for 30 35 minutes, covering the top of the pumpkin with foil.
- When ready to serve, garnish with scallions and serve the soup right out of the top of the pumpkin.
Hint: for a nice twist, serve with cheddar cheese grated over it.

|
|


