
|

|


 |
Featured Quote: "Though I do not believe that a plant will spring up where no seed has been, I have great faith in a seed. Convince me that you have a seed there, and I am prepared to expect wonders." |
|
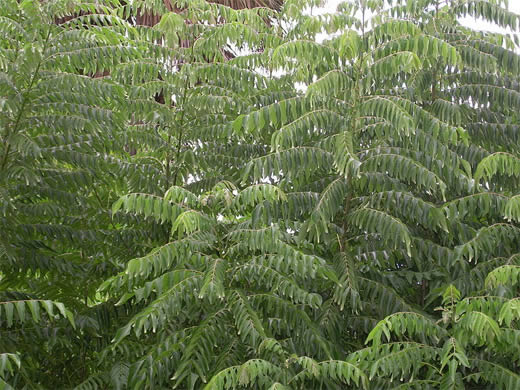
Arriving Soon, Murraya koenigii or the Curry leaf. This small tropical/sub-tropical tree is native to Sri Lanka and India. The fresh leaves are used in cooking and are an important flavoring in Indian/Asian cuisine. We will have a very limited quantity arriving in the 2 gallon pots. This will be our only shipment of this plant. |

|
 |
|
Is the bearded iris for you? Well, the more you learn about this versatile little bloom, the more you will appreciate its simple splendor. With old-fashioned grace, the bearded iris is available in a host of colors and sizes. Fun to share, easy to grow and care for, it incorporates nicely in sunny landscapes. Bearded irises range in height from about 8 inches high to 3 feet. The smaller the iris, the earlier in the season it will flower. A small cluster of the dwarf varieties will work nicely in a rock garden. Taller varieties work well as borders or in a sunny corner all by themselves. The key to growing them is how you plant the odd-looking rhizome. Unlike most other bulbs, only the roots are buried in the soil. Bearded iris are very drought tolerant; they prefer sunny locations where the soil can dry out between watering. Before planting, work your soil well by adding a soil amendment. Add a little bone meal or a bulb food and your plants should thrive and bloom their hearts out for you. Caring for and sharing your bearded iris is not complex. In late summer, your iris clumps will become crowded and blooms will suffer. Unless you see buds, your center rhizome will probably not bloom a second time; compost it! Lift the entire clump with a garden fork. Cut apart the new younger siblings from the older center rhizome, allow a day or two to dry, and replant as before. Or if you prefer, share with friends and neighbors so you can buy some new colors! Bearded Iris bulbs have arrived. We have many colors available to choose from. |
 |
|
When I was a kid, the arrival of Indian summer was the last summer hurrah! It was still light enough to play outside after dinner, and warm enough to wear shorts. Even though school had begun, you still had a couple of weeks of warm summertime fun. Well, now I realize that it was also a couple more weeks of summertime flower color for my parents to enjoy in their gardens! Somehow, I think they must have planned ahead to ensure that the gardens were beautiful. That's right. Now is the time to tuck into your garden beds and patio paradise containers some of your favorite late summer and fall blooming perennials and shrubs. You may be the type of gardener who has a complete plan of colors, sizes and shapes in mind. Or you might be a gardener that loves just to collect plants of all colors, sizes and forms. You know who you are and what your style is. There are plenty of late summer and autumn bloomers to choose from. Our plant selection is a veritable treasure chest of Indian Summer colors. Come into the garden center and begin choosing today. Don't forget to pick up a good soil amendment. Oh yes, and to promote those non-stop blooms, feed them regularly. Then sit back on a lounge chair or hammock--and enjoy your Indian summer garden in full bloom! |
 |
|
One of the great things about the fall season is that it presents the opportunity to enjoy the vivid color of chrysanthemums, helping gardeners to achieve four-season interest in their gardens. Chrysanthemum flowers are also a favorite of florists for arrangements, due to the longevity of their blooms. Chrysanthemums were cultivated in China as a flowering herb as far back as the 15th century BC. The flower was introduced into Japan in the 8th century AD, and the Emperor adopted the flower as his official seal. Today there is still a "Festival of Happiness" in Japan celebrating the flower. Mums were brought to Europe in the 17th century and the rest of the world has enjoyed them ever since. Modern chrysanthemums are much more showy than their wild relatives. The flowers occur in many flower forms, and can be daisy-like, decorative, pompons or buttons. Chrysanthemums come in a wide variety of colors, including white, off-white, yellow, gold, bronze, red, burgundy, pink, lavender and purple. Chrysanthemum plants can grow to be 2-3 feet high, depending on the cultivar and growing conditions. There are "hardy mums" and "florist mums." Hardy mums put out stolons. Florist mums put out few or no stolons, which makes them less likely to over-winter in cold regions. Mums look best planted in a mass--but for good health don't overcrowd them, since good air circulation reduces the chance of disease. Plant chrysanthemum flowers in full sun and well-drained soil, enriched with a soil conditioner. Chrysanthemums are "photoperiodic," meaning they bloom in response to the shorter days and longer nights experienced in fall. Therefore, do not plant chrysanthemum flowers near street lights or night lights: the artificial lighting may wreak havoc with the chrysanthemums' cycle. We invite you to visit us and take some hardy mums home for your garden to brighten up your autumn garden. Chrysanthemums also make great housewarming gifts--and your friends will thank you for thinking about them. So remember, mum's the word! |

|
By Tamara Galbraith Here's a basic primer on how to divide some of your perennials. Don't neglect this fall duty; it's nature's way of giving you free plants! Just like pruning, dividing should be done in the season opposite of planting, i.e., spring flowering = fall dividing and vice versa. Try to plan your dividing project for a cloudy, slightly cooler day with a good chance of rain thereafter. Most perennials should be divided every three to five years. However, some, like columbines, poppies and euphorbias shouldn't ever be divided, even if they start to clump. Don't divide woody plants like lavender, rosemary or the bigger artemesias either. Before starting your division project, thoroughly water all plants to be divided a day or two before you dig in. Likewise, prepare planting holes for the new divisions so they aren't languishing (and drying out) above ground for too long. You can also pot up divisions to build up size, overwintering pots in a protected environment. Make sure your tools are clean and, more importantly, very sharp. Use a sharp pointed shovel or spading fork to dig down deep on all four sides of the plant, about 4 to 6 inches away from the plant. Pry underneath and lift the whole clump to be divided. If the plant is very large and heavy, you may need to divide it right in the ground with a sharp shovel before lifting the new sections out. Shake or hose off loose soil and remove dead leaves and stems. This will help loosen tangled root balls and make it easier to see what you are doing. Depending on the root system, divide your plants as follows: • Spreading root systems that have just a mess of disorganized roots include such plants as asters, bee balm, lamb’s ear, purple cornflowers and many other common perennials. Some can get out of control unless you divide them frequently. Luckily, they can usually can be pulled apart by hand, or cut apart with shears or knife. Divide the plants into clumps of three to five vigorous shoots each. Toss the center of the clump into the compost pile if it looks like it's run its course and is weaker than the outside edges. • As the name suggests, clumping root systems originate from a central clump with multiple growing points and usually have thick fleshy roots. This group includes astilbes, hostas, daylilies and many ornamental grasses. A sharp knife is handy with these guys, as it is often necessary to cut through the thick crowns to separate the divisions. You can also pry apart these roots with two digging forks held back to back. Make sure at least one developing eye or bud exists on each division. • Rhizomes are stems that grow horizontally at or above the soil level. Irises are the most common perennial with this type of root system. Divide irises any time between a month after flowering until early fall. Cut and discard rhizome sections that are one year or older and/or showing signs of disease and insect damage. Iris divisions should retain a few inches of rhizome and one fan of leaves, trimmed back halfway. Replant with the "shoulders" of the rhizome showing above soil level. • Tuberous roots, like dahlias, should be cut apart with a sharp knife. Every division must have a piece of the original stem and a growth bud attached. After division they can either be replanted or stored for spring planting. Silly as it sounds, dividing is probably my favorite fall gardening chore. When you dig up one daylily and all of a sudden it becomes four...well, for an avid gardener, that's like a magic show and a birthday gift all rolled into one! |
 |
|
My orchid's roots are bulging out of the holes in my container. Do I need to re-pot it? Answer: Ideally, orchids should be repotted immediately after flowering. For best results, orchids should be grown either in sphagnum moss or a fine-medium orchid bark mix. You can also combine the two. Orchids do not grow well in soil, because that is not how they grow normally. Most are found in the tree canopy high above the jungle floor. Make sure your new orchid pots have good drainage. |

Step by Step:
Yield: 12 servings
|

 click here for a printer friendly version of this page
 |
Written content © 2004-2014 Garden Partners LLC, or respective authors. All Rights Reserved. Privacy Policy. All written content contained in this site is protected by United States copyright law and may not be reproduced, distributed, transmitted, displayed, published, or broadcast without prior written permission of Garden Partners, LLC. You may not alter or remove any trademark, copyright or other notice from copies of the content. Would you like a newsletter like this for your nursery or garden center? Please feel free to look at what we have to offer and contact us for your garden center marketing solutions. |